All Wizard101 & Pirate101 Zeke & Eloise Quest Guides
Looking for where to find all of Zeke's items or Eloise's flowers? Here's a page with all of the Zeke and Eloise quests for Wizard101 and Pirate101 and where to find the items! Complete your quests for training points with these guides!
[full_width]
All Wizard101 Zeke & Eloise Guides
Here's a guide to all of the Prospector Zeke and Eloise Merryweather quests across the Spiral with a training point to offer! The guides offer an updated look at where to find the hidden items in each world. New guides will appear in this section as they're completed.
Click on any image to see the guide.


Retired: Wizard101 Zeke Quest & History Book Guides
Zeke quest guides for Wizard101 are listed below. These guides are added manually and will be updated when possible. Each guide contains a screenshot of the item you're searching for, a description of the location, a map snippet of the location, and in some cases the full map.
MOUSEOVER ANY IMAGE FOR A MAP

Colossus Boulevard Smith
Go all the way to the end of the road and look to your left
|

Commons Smith
In the Fairgrounds behind a tent to the far left;
|

Cyclops Lane Smith
In the center of the lane on one of the grass patches across the river |

Firecat Alley Smith
In front of the Fireglobe Theater to the right
|

Golem Court Smith
Behind Golem Tower by a tree
|

Olde Town Smith
Just left of Gloria, and across from the Bazaar
|

Ravenwood Smith
Just to the right of the Myth school along the ledge
|

Shopping District Smith
Turn left after entering the Shopping District, and work your way into the buildings
|

Unicorn Way Smith
Just before you enter the Hedge Maze, look to your left along the wall
|

Triton Avenue Smith
Instead of turning right off the bridge to the teleporter, go left across the waterfalls
|
History Books -
1. Unicorn way, Lady Blackhope's room - History of Life magic.
2. Cylcops Lane, General Akillies's room - History of Myth magic.
3. Triton Avenue, Harvest Lord's room - History of Storm magic.
4. Firecat Alley, Prince Allicane Swiftarrow's room - History of Fire magic.
5. Colossus Boulevard, Prince Gobblestone's room - History of Ice magic.
6. Haunted Cave, Lord Nightshade's room - History of Death magic.
For the 1st book, complete Unicorn Way, an Olde Town guard tells you to defeat Lady Blackhope, then you can access the next 3 streets, then finish all the quests in
each street and defeat the bosses one by one (Including the Storm Kraken), then go to the Headmaster and he will give you access to the last street, finish those
quests, defeat the boss, (You'll be asked to defeat 2 other bosses on the street, then asked to defeat the main boss again,then you'll be done!) then go back to the
Headmaster and you'll have to defeat Foulgaze in Olde Town, then go after Lord Nightshade in Stormdrain Tower in the Haunted Cave.
MOUSEOVER ANY IMAGE FOR A MAP

|

|

|

|

|
Altar of Kings Beetle
Before entering the Chamber of Fire, go down the ramp to your right
|
Chamber of Fire Beetle
At the end of the center area, follow the switchbacks up until you find one that isn't blocked
|
Emperor's Retreat Beetle
On a dock across the Frozen Lake
|
Entrance Hall Beetle
In front of the entrance to the Vault of Ice
|
Karanahn Barracks Beetle
Enclosed in a housing structure on the island against the wall opposite the entrance |

|

|

|

|

|
Krokosphinx Island Beetle
Go left around the Krokosphinx to find it
|
Oasis Beetle 1
Behind the shop directly right of the teleporter
|
Oasis Beetle 2
To the right of the library
|
Tomb of Storms Beetle
Behind the teleporter between the main island and the Tomb of Storms
|
Well of Spirits Beetle
Up the stairs and behind the center structure
|
History Books -
Krokotopia has no history books
MOUSEOVER ANY IMAGE FOR A MAP

Big Ben Cat
Behind some crates in the room with wisps
|

Chelsea Court Cat
Outside Chelsea Court tower
|

Digmoore Station Cat
Make a sharp right when you enter Digmoore station - it's in the corner
|

Hyde Park Cat
Before going inside the Greenhouse, turn left
|

Ironworks Cat
Past the final boss on the railing
|

Katz Lab Cat
Before fighting Katzenstein, turn right up the incline
|

Knight's Court Cat
Near the main (center area) tower in Knight's Court
|

Newgate Prison Cat
Just to the left after getting through the prison
|

Regent's Square Cat
To the right of the entrance to Scotland Yard
|

Scotland Yard Roof Cat
Follow the ramp through to the entrance to Knight's Court. Turn right there.
|
History Books -
Hyde Park - Ancient Marleybone - Where you find Baxter and have to fight the Gearhead Destroyer.
Chelsea Court - Theories of Marleybone - Chelsea Tower (Where you fight Potbelly).
Ironworks - Rebirth of Marleybone - Where you fight Pops O' Leary.
Newgate Prison - The Golden Age - Where you fight the Agony Wraith.
Knight's Court - The Spiral - Where you fight Doctor Xavior Xandros's/Jacques the Scratcher.
Katzenstein's Lab - Modern Marleybone - Where the charging lever in his lab is.
Big Ben - Marleybone Civil War - Where you fight Meowiarty, Mechanical Healer, and the Agony Wraith.
MOUSEOVER ANY IMAGE FOR A MAP

Hametsu Village Oyster
Before leaving the main area onto the road, look to your right
|

Jade Palace Oyster 1
Next to a pink tree near the Rock Garden
|

Jade Palace Oyster 2
On the grassy area surrounded by water before entering the Shoshun Village |

Kishibe Village Oyster
Across the river and up the hill near Mossback
|

Shirataki Temple Oyster
Before entering the final temple, look to your right
|

Shoshun Village Oyster
Behind the first house to your left upon entering the Shoshun Village
|

Tatakai Outpost Oyster
In the center of the battle area behind the well
|

Tree of Life Oyster
Against a wall in the very center area of the Tree of Life, opposite the NPC
|

Village of Sorrow Oyster
In the town just to the right of the Town Dojo
|

Yoshihito Temple Oyster
In the center area opposite the Village of Sorrow entrance
|
History Books -
Hametsu Village - Volume 1 - Do-Daga's room.
Crimson Fields - Volume 3 - War Oni's room.
Kishibe Village - Volume 4 - In the Shrine of the Spirit(s).
Shirataki Temple - Volume 5 - Plague Oni's room.
Village of Sorrow - Volume 6 - Fushiko's room.
Tree of Life - Volume 7 - Look near the Death Oni in the Spirit World.
Jade Palace - Volume 8 - In the Emperor's Throne Room.
MOUSEOVER ANY IMAGE FOR A MAP

Athenium Rose
Walking toward the Tower Archives, turn right behind the buildings
|

Basilica Rose
Right behind the Spiral door
|

Crystal Grove Rose
In the second grove, in a small enclosure near the center by an orange crystal
|

Dragon Claw Canyon Rose
Turn left upon entering. It's behind the fence against the wall
|

Dragonspyre Academy
Rose
Left of the drake, follow a narrow passage
|

Crown of Fire Rose
When entering the final room, go left and look along the crack in the floor
|

Grand Chasm Rose
Go into the Grand Chasm Past instance and go to the end of the hall to your right
|

Labyrinth Rose
In a corner behind a tower near the Gallium Palladin
|

Necropolis Rose
Go down the ramp to the left of the Drake Hatchery entrance. Look in the corner.
|

Tower Archives Rose
Make all of the lefts you can until you find an area with two buildings. Look behind the left.
|
History Books -
The Tower Archives - Look in Zarathax's Tower.
Plaza of Conquests - Look in General Greystone's tower.
The Grand Chasm - Look in Flamebringer's Tower.
The Drake Hatchery - Look in Giant Homunculus Tower.
The Labyrinth - Look in In Property Master's Tower.
The Crystal Grove - Look in In Chronius's Tower.
The Great Spyre - In the Path of Scales,where the Lavalings are.
MOUSEOVER ANY IMAGE FOR A MAP

Helgrind Warren Bird
In the Kraken chamber - defeat the first boss and look left in the cave area
|

Mirkholm Keep Bird 1
Inside the Wolf Fort, take every right possible
|

Mirkholm Keep Bird 2
In the center of the caves, look for a small enclosure
|

Northguard Bird
Up the ramp to the King's cabin, go left past the guard
|

Ravenscar Bird 1
In the caves, go up the next to last ramp, turn right, and follow the flat ramps
|

Ravenscar Bird 2
To the left in the final Coven fortress
|

Savarstaad Pass Bird 1
In the Boar camp to the right of the main, instanced hut
|

Savarstaad Pass Bird 2
In Webwood under the large, fallen tree stump
|

Vigrid Roughland Bird 1
In the first area, follow the river right to the end, then turn right. It's near some bushes.
|

Vigrid Roughland Bird 2
Very northeastern corner of the map, up a hill by three caves
|
History Books -
Northguard - In the King's cabin.
Savarstaad Pass - In Skellek's cabin.
Frostholm - In Ivar Anderson's cabin.
Mirkholm Keep - In the Wolf Palace.
Winterdeep Warren - Near the end of the maze. You'll have to go back in to get this.
Hall of Valor - Near the place where you fight Jotun.
Ravenscar - In the Coven's fortress.
MOUSEOVER ANY IMAGE FOR A MAP

Austrilund Trogg
By one of the tents in the Boar Camp
|

Hrundle Fjord Trogg
Look to your right directly before entering Sudrilund
|

Nastrond Trogg
Behind some runestones in the final room of the instance
|

Nordrilund Trogg
In the throne room of the location, go left along the snowy path
|

Sudrilund Trogg
Past the ice-blocked bridge, look along the edge of Sudrilund
|

Vestrilund Trogg
Just past the throne room, up a long ramp, behind a bush
|
History Books (Runestones) -
Austrilund - Look in Sulkir's cave
Hrundle Fjord - Look in Thulkir Battlegloom's cave
Nastrond - Look in the room in Nastrond with Njal Silversong, Ulfang Greathorn, Thorfin Treetamer, and Agnetta Broadblade
Nordrilund - Look in Hammar Frostheart's cave
Sudrilund - Look in Kormak Shadowclaw's cave
Vestrilund - Look in Gurz's cave
MOUSEOVER ANY IMAGE FOR A MAP

Library Archives Flower
Follow the archives until you hit a room with a plant in the center and books. Look right.
|

Pegasus Place Flower
Look to the right wall on your way to the Crystal Tower
|

Pigswick Academy Flower
Behind a pillar across from Bleys Flamerender
|

Tanglewood Way Flower
Across from the entrance to Lord Bramble's Tower
|
History Books -
Pegasus Place - In the Crystal Tower with Lord Graustark
Pigswick Academy - In the Tournament Hall by the wand displays
Library Archives - Along a wall to the right on your way to the missing student
Tanglewood Way - Look in Lord Bramble's Tower
MOUSEOVER ANY IMAGE FOR A MAP

Celestia Base Camp Lizard
Behind the main structure and to the left
|

Crab Empire Lizard
Along the left-hand wall in the tunnel with the pirates
|

District of the Stars Lizard
In the Chantry down a ramp to the right of the room with the Spiral
|

Grotto Lizard
In the area that leads to the very left of the Coral Castle
|

Portico Lizard
In the unused downward ramp among some rubble
|

Science Center Lizard
In the final area to the left along the upper level
|

Stellarium Lizard
In the room to the right with hanging papers and a staircase
|

Stormriven Lizard
In the Ossuary by the hidden trainer
|

Stormriven Hall Lizard
Behind the entrance ramp
|

Survey Camp Lizard
Along the walkway to the left |
History Book (Zodiac Tomes) -
Survey Camp - Look in Optio Agenor's hideout
The Grotto - Look in Governor Neverus's castle
District of the Stars - Look in Brutus Starkwave's lair
The Stellarium - Look in Selwyn Skywatcher's room
The Floating Land - Look in Bristleclaw's clearing
Stormriven - Look in Karolak Nightspinner's room
Stormriven Hall - Look in Tempus Stormfist's temple
The Lunarium - At the beginning of the location (Note: complete the Portico to get here)
The Science Center - Look in Maglump's reactor room
Crab Empire - Look on Calypso's ship
The Chancel - Look just past the solar gate
Trial of the Spheres - Look near Ptolemos
MOUSEOVER ANY IMAGE FOR A MAP

Baobab Market Monkey
At the docks, turn right around the building
|

Elephant Graveyard
Behind a gravestone past the Drum House
|

Savannah Monkey
Behind a tent in the final area of the Savannah
|

Stone Town Monkey
Turn left at the Darajani Palace entrance
|

Waterfront Monkey
Diner across from Belloq
|

Zamunda Monkey
In Goliath Chon'darr'hna's house
|

Zamunda Outskirts
By a tent along the river |
History Books (Art) -
Baobab Crown - Look in the Library
Savannah - Small enclosure near the back of Nemean Rock
Savannah - At Nemean Rock
Waterfront - Look in the Stone Town Library
Drum Jungle - Near the waterfall and cave
MOUSEOVER ANY IMAGE FOR A MAP

Abbey Road Crow
Just inside Abbey Road, turn left in front of the wall
|

Caer Lyon Crow
At the top of Feletheus Barca's tower
|

Caliburn Crow
Inside the Bane Wyrm's lair
|

Dun Dara Crow
Inside Catalan the Lightning Lizard's cave
|

High Road Crow
In the Harlequin Knight's tower
|

Lake Shore Crow
Inside Black Annie's hut
|

Outer Yard Crow
Go up the ramp near the NPCs and to the left - look up
|

The Wild Crow
Inside Dread Keep with Maudit Soulban
|

The Wyld Crow
Inside the Lost Abbey with the Lord of the Brocken
|
History Books (Tapestries) -
High Road - Look in Sir Terrance Thornwhip's tower
Caer Lyon - Look in Chagan Nosebiter's hideout
The Wild - Look inside the White Owl Tower
The Wyrd - Look inside the Nameless Knight's tomb
Dun Dara - Look in Finn Gingersnap's tower
Catacombs - Look in the Hobgoblin Blood Captain's chamber
(Back to Top)
Pirate101 Zeke Quest Guides
Zeke quest guides for Pirate101 are listed below. These guides are added manually and will be updated when possible. Each guide contains a screenshot of the item you're searching for, a description of the location, a map snippet of the location, and in some cases the full map.

Skull Island Funky Bunch
Skull Island Docks
Just across the second bridge to the Water Mole camp
|

Traitor's Cave Funky Bunch
Blood Shoals
At the back of the cave between the table and pool of water
|

Corsair's Cove Funky Bunch
Corsair's Cove
The cove itself is inside Corsair's Channel. It's opposite the dock behind the house.
|

Ruined Lighthouse Funky Bunch
Ruined Lighthouse
In a small, abandoned shack just off one of the paths
|

Volcano! Funky Bunch
Waponi Wu
On the top level, look to your left next to the plant
|

Gunn's Tomb Funky Bunch
Bounty Island
To the right of Captain Gunn in the tomb under Bounty Island
|

Puerto Mico Funky Bunch
Puerto Mico
Just across from the chapel on a patch of green between two benches
|

Sacrifice Cave Funky Bunch
Isle of Doom Docks
It's next to the drop off where you can see the boss from the upper level
|

Valley of the Gold Monkey Funky Bunch
Isle of Doom Docks
Just to the left outside the pyramid before entering Gortez's lair
|

Scurvy Dog Hideout Funky Bunch
Scurvy Dog Hideout
Between the stairs to the temple and the sunken ship beside a house
|
(Back to Top)
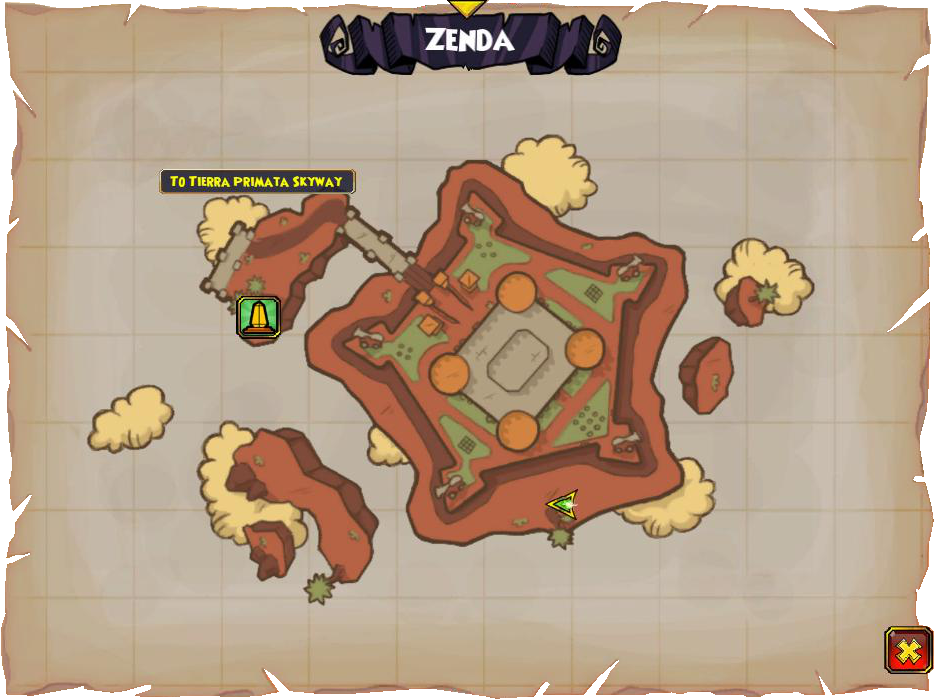
Zenda Gypsy King
Zenda
Around the outside of the prison boundaries near a tree
|

Monquista City Gypsy King
Monquista City
Between two building along the northern wall
|

St. Bonobo's Abbey Gypsy King
St. Bonobo's Abbey
Just around the tower on the hill
|

La Mancha Gypsy King
La Mancha
Near the southern tip behind a large rock |

Diablo Cut Docks Gypsy King
Diablo Cut Docks
Behind a small rock opposite the Life Fountain |
(Back to Top)

Steed's Villa Seagull
Captain Steed's Villa
Behind the house on one of the bushes
|

Sivella Seagull
Sivella Dock
On the top level railing in the corner with the Marleybone plaque
|

Laurentine Library Seagull
Sivella Dock
First section up the stairs on the right when entering the library
|

Granchia Seagull
Granchia
Other side of the entrance to the catacombs on a stone block
|

Granchia Catacombs Seagull
Granchia
Behind the coffin in the third section on the right past the only one without coffins
|

Armada Fortress Seagull
Armada Fortress
Up either outer set of stairs on a barrel
|

Scorpion Cave Dixie Chick
Scorpion Rock
After entering, go right immediately around the pool of water and find it near the edge of the drop off
|

Boot Hill Dixie Chick
Boot Hill Docks
Partway up the hill by a monument just outside Skreech's Cave
|

Banditoad Gulch Dixie Chick
Santa Pollo
At the very back behind the brick house
|

Castillo Sapo Dixie Chick
Castillo Sapo Docks
Go around to the back side of the entire structure and look by a cactus
|

Medicine Show Dixie Chick
Travelling Medicine Show
Near the front of the ship in the back of the location
|

Old Chirp Place Dixie Chick
Old Chirp Docks
Go left of the stalls along the edge
|

Old Jailhouse Dixie Chick
Jailhouse Docks
Take a right near the entrance and look next to a brick wall surrounding a tent on three sides
|

Solitude Dixie Chick
Solitude Docks
Defeat Squinty, but do not go in the cave, go around it and find the chick behind the rock
|

Abandoned Church Dixie Chick
Abandoned Church
Simply go around to the back of the church and look near a bush
|

Motherlode Mine Dixie Chick
Motherlode Mine Docks
In the easternmost crystal cavern near the bottom of the mine
|
(Back to Top)

Hamamitsu Garden SK
Hamamitsu Garden Docks
Across the path from the Banquet Hall behind a well
|

Sujimura Shonen Knife
Kita Dock
Behind Lord Mayor's house at the north end of the village
|

Yagizawa Shonen Knife
Miniami Dock
In front of the path into the village, go right on the "ledge" and look behind a house
|

Rokugara Island Shonen Knife
Rokugara Island
On a dock behind some houses opposite the ship dock
|

Yakooza Cave Shonen Knife
Rokugara Island
In the back of the cave behind a broken ship
|

Yama Kai Shonen Knife
Yama Kai
Stay to the very right of the island and go as far back as possible
|

Khotan Shonen Knife
Khotan Docks
Cross the bridge and stay left; look behind a tree
|

Moomori Compound Shonen Knife
Nishi Dock / Kita Dock
In the very center up the stone steps next to the tree
|

Subata Temple Shonen Knife
Subata Temple Docks
Past the outdoor shopkeepers around and down a path near a cage
|

Paths of Penance Shonen Knife
Icy Dock
Southern end of the square, center area behind a rock and frozen pool
|

Temple of the West Wind Shonen Knife
Icy Dock
Northernmost point on a destroyed house
|

Raven Island Shonen Knife
Raven Island
On the very top tier of frozen pools
|

Ashen Roads Shonen Knife
Ashen Docks
Southeast corner of the village beside a red house
|

Temple of the North Wind Shonen Knife
Ashen Docks
In the small enclosure with two goat monks next to the river
|

Lake of the Rising Sun Shonen Knife
Windy Dock
In the village center by the broken Moodha statue
|

Corrupted Shrine Shonen Knife
Verdant Dock
At the first intersection by a statue base
|

Temple of the East Wind Shonen Knife
Verdant Dock
Just to the east off the temple stairs on the broken bridge
|

Sacred Mountain Shonen Knife
Crimson Dock
Near a covered pavilion along the east side of the river
|

Temple of the South Wind Shonen Knife
Crimson Dock
Along the road near the southern tip of the location
|
(Back to Top)

Isle of Dogs Rolling Stone
Isle of Dogs Docks
Before the gate to Berkeley Square, go left and look in front of the shops in the corner
|

Barkeley Square Stone
Isle of Dogs Docks
Go around the left side of the Glass House
|

Isle of Dogs' Sewer Stone
Isle of Dogs Docks
In the corner behind the sewer tavern, not far from a weapons vendor
|

LaFitte's Lair Rolling Stone
Isle of Dogs Docks
Inside Lafitte's Lair dungeon (entrance pictured on map); Defeat the first boss and turn left, then go as far as you can
|

Red Fox's Lair Stone
Isle of Dogs Docks
Go in and stay right wherever possible - you can't miss is (The entrance arrow on the maps is not correct)
|

Invader's Fortress Hold RS
Armada Fortress
Down the stairs (entrance pictured on map), past the battle, and in the back
|

Main Battery Hold Stone
Beachhead
After the first Bishop Fight in the Central Core, go up the stairs and look at the end of the balcony / upper level
|

Walkie Hotel Rolling Stone
Isle of Fetch Docks
Between two large piles of rubble in the final battle room upstairs
|

Isle of Fetch Rolling Stone
Isle of Fetch Docks
The front of the crashed Armada ship points the way - check behind houses on the right side of the street
|

Wreck of the Victory Stone
The Wreck of the Victory
Past the first Rooke fight, up the ramp, behind some crates |
(Back to Top)

Nova Aquila Eagle
Nova Aquila
Not far from the tavern, inside a house containing water in the corner
|

Delphos Eagle
Delphos
Upon docking, go straight until you reach the statue - look behind it
|

Illios Eagle
Illios
After entering, take the first bridge to the right, another bridge on your right, and check along the back
|

Achaea Eagle
Achaea / Sparta
Follow the path in Achaea until you see centaurs, then look near ruins in the back
|
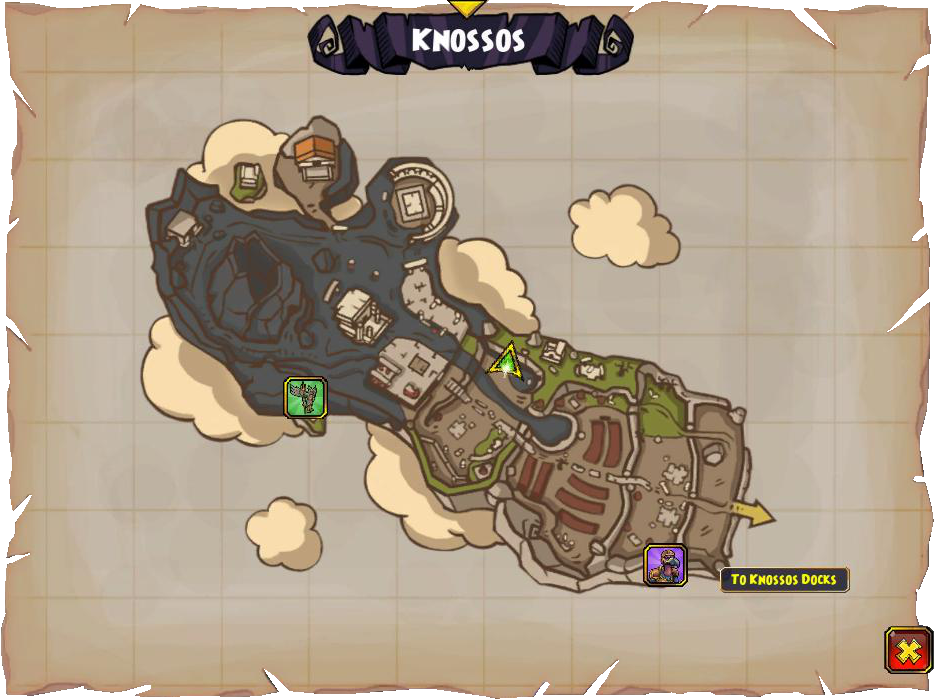
Knossos Eagle
Knossos
Right of the colossi, half buried in the grey, solidified magma
|

Talos Eagle
Talos
Past the colossi to the left of the temple against the back
|

Unoculum Eagle
Unoculum
As you prepare to enter the cave on the top tier, turn right and look behind
|

Laestrygon Eagle
Laestrygon
Follow the bridges to the end of the location - use boards to pass over a gap and look behind the rocks
|

Anthemusa Eagle
Anthenmusa
Just beyond the sirens' pool of water, look against the side of the cliff
|

Ithaca Eagle
Ithaca
Past the center pool of water and U-shaped building - it's down the steps in the back |
(Back to Top)


