Other Guides
Guides appear regularly in posts on Swordroll's Blog, but there are also some guides specific to pages under the Game Guides & Information section. Here you can look at a comprehensive list of many of the post guides available, see the most recent post guides, and access other pages, including pack and bundle reviews, Grub Guardian and Zeke guides, helpful links, and more. The "Recent Guides" panel is updated automatically when new guides are published on the blog, so check back often for new content!
Grub Guardian is KingsIsle's new free game that allows you to train your pets by playing tower-defense style games, and earn possibly more than four pet experience! Before reading this guide for users who know the basics, be sure to look HERE. You can play the game at https://www.wizard101.com/onlinegames/grubguardian.

When you buy a tower, you have an option to sell it for a bit less than you bought/upgraded it for. This is the tower value, and counts toward your final score. Your final score is determined by the remaining food, the remaining silver, and the tower value. Because of the way it works, you will score higher by using less towers. The first few levels are easy to obtain gold on, you just have to use minimal towers to maximize points.

The above is a second chart with some helpful tips. The bar above the enemies are their health. When they flash green, the monster resists the attack. When they flash red, they are vulnerable to it, so naturally, you want to look for an enemy's weakness. For some, this is essential to killing them. Do look for multiple paths and entrances. Try to centralize your defenses in one place, where they'll be able to attack all tracks. If this isn't possible, spread your defenses carefully - this will sometimes be necessary. There IS one backup if something is going wrong - Ambrose's Annihilator! It fills up over time, and one full, you can activate it to cause mass destruction on all of the enemies on the field. Be careful when you use this, though! It's best to use it on a final boss, but if you have to use it on a ton of lower level creatures to save even one dish of food for that high score, do it! Just be sure to time it right. Try to wait until as many creatures are out of the portal as possible for the best effect.
Lets talk towers. Yes, they can be upgraded. Each tower has five levels, the obviously get better as they go. Despite these facts, you don't always want to upgrade. You'll see more specific reasons below. Here are the basics on towers and pets.

As you can see, a good pet is super important! While training a pet is fun, some maps can't be beaten without a higher level pet, and one certainly makes things easier. I normally use a Fire pet, ranging from Adult to Epic, though the Adult and Ancient don't make it through many maps for gold level. Your pet is a 2x2 area, and is your best friend. It's a free starter-tower to kill enemies while you fortify your defenses. An epic Fire pet will nearly take care of all of Unicorn Way. Be sure to grab a good pet when playing for high scores! An Epic Life pet would be interesting... it'd be effective and save you good money!

The above is a chart of the five levels of the most basic tower - the myth tower. Myth towers are good towers to start out with. Even though they aren't very powerful, they have a very low cooldown time, making them the fastest attackers. They're also the cheapest. Sometime you don't need a strong arm, you need two arms. I lov the trolls. For 15 total silver, you can get a quick-throwing, angry troll who is surprisingly effective. I like to sometimes, rather than upgrade one tower, create an entire army of trolls, and that's oftentimes more effective that a single tower.
I like to use this with nearly every strategy in some way, but in particular. I call it the "Frozen Troll." You'll find Ice towers to be some of the best. Despite their low attack power, they freeze enemies in place. By spreading several Ice towers out and placing tons of trolls, you've got an attacking army and a slower journey for your opponent.
I like to use this with nearly every strategy in some way, but in particular. I call it the "Frozen Troll." You'll find Ice towers to be some of the best. Despite their low attack power, they freeze enemies in place. By spreading several Ice towers out and placing tons of trolls, you've got an attacking army and a slower journey for your opponent.

This next chart is Fire towers! These have never been my favorite, because I already have my Epic Burnzilla, and they are just too expensive! While I'm sure you can find some effective strategies with them, they aren't the best. The highlight of the Fire minions is that they leave a lingering effect, like "DoTs" in-game. They do splash damage, which is a positive for large groups, but also have that damage over time effect, which means that you don't need to really freeze them in place to be effective, their attacks work even after the enemy is out of their range. I DID just realize that you can't see Efreet's Burn Damage, which is six per second. While they aren't the best, you can only use these a Myth towers in Unicorn Way, and they do play a role in a few of your maps.

Ice towers are probably some of my favorites. They start as a Snow Serpent, and work their way up to a Snow Angel. These towers, while doing little damage, can add up, and can be useful for their abilities to reduce enemy speed. Notice, though, that the intervals aren't too different. You start with enemies at 60% speed, which means a 40% reduction, and over the course of 74 gold, it increases by only 20%, so at first, upgrading isn't very practical. Instead, use that gold to buy MORE of the towers and spread them out. Make sure they enemies are slowed down during the entire journey to the food bowl, and make an upgrade or two as you get enough silver.
I can't say I like using these in any particular strategy, because they're essential to every strategy. Without them, your fast-moving opponents can avoid too harsh of attacks and get to the dish quickly. This is especially true with a few of your bosses.
I can't say I like using these in any particular strategy, because they're essential to every strategy. Without them, your fast-moving opponents can avoid too harsh of attacks and get to the dish quickly. This is especially true with a few of your bosses.

Ooh... Ahh... Storm - so these must be the most powerful, right? They ARE the most powerful towers, both at their first and last levels. They cost quite a lot, though they aren't the most expensive. Now what's one of Storm's weak points? You guessed it! These towers shoot a beam that goes all the way across the screen, and damages anyone in its way, so if you can get it set up in a spot where it will shoot down a line, you're in good shape. However, if enemies move fast enough, the Storm towers can sometimes miss it completely! I don't use these much, because they aren't as effective as an army of trolls for what they cost.
When I do use them, it's one tracks like Colossus Boulevard. You put one or two at the end of the long, final stretch, and Ice towers at the tower end to freeze the enemies for a bit of a... shocking surprise.
When I do use them, it's one tracks like Colossus Boulevard. You put one or two at the end of the long, final stretch, and Ice towers at the tower end to freeze the enemies for a bit of a... shocking surprise.

You'll be interested in Balance! While they're the most expensive to upgrade, they can also be the most effective. This is one tower whose special really doesn't seem to kick in until Locust Swarm, but you can see for yourself. Balance towers are great for situations where you have one thing after another coming out of the Spiral door. Did you think the Hero's Camp was hard? Try two Balance towers and you'll have 999 silver in a heartbeat. They don't always work the best, because the focus of their power is chains, so if everything starts spreading out, they'e less effective. Ra's Chain Splash Radius Increase is 10%.

Of course, the Death school doesn't disappoint. Their towers have a chance of instantly killing something. Having trouble with tough Kraken bosses in the Celestia levels? Try a Death minion. Then you won't have to kill anything health point by health point, you'll instantly kill it. You can note that the Ghoul already has a 25% chance, and it does cost a bit to get it up to the Skeletal Dragon to get 100% chance of instantly killing something. Plus, its attack speed is reduced quite a bit with the first few upgrades. You can have six Ghouls with 25% chance for every Skeletal Dragon with a 100% chance, but I still recommend that you eventually level to Skeletal Dragon, especially with tougher enemies that you need dead for sure. Note that several BIG bosses, we're talking bigger than what you though were large bosses, are immune to this, and because of this tower's low attack rate, it then becomes useless.
I like to use these with Life towers close by, and fully upgraded, too. In Ravenscar, I once has so many that everything was being instantly killed.
I like to use these with Life towers close by, and fully upgraded, too. In Ravenscar, I once has so many that everything was being instantly killed.

We end our tower bit with Life. At first, they'll seem useless, but they're arguably the most useful tower in the game, and also tie with Balance for most expensive. Don't try placing a Sprite as a last-minute hero, though, because they don't attack! They increase the rate of attacking. Think about that for a minute. By the time you end up with Bartleby, everything will be attacking twice as fast as usual! You might say its like getting double what you buy from then on. Its range also increases with each upgrade, so your further towers can get the bonus two. Now I'm just wondering if another tower would double that rate. And would it double the original speed making it 3x or double the doubled speed making it 4x, or would it have no effect, leaving it at 2x?
Jan. 10: At this point, I've finished every track at least at a bronze level, so if you need tips on a specific level, comment below. As I revisit the levels attempting to obtain gold, you'll see those successes.
Jan. 17: By now, I've updated the list with far more than before. Check them out!
Jan. 18: More videos added!
Jan. 21: More videos added!
Important Note: These levels are done with an Epic Fire pet. Depending on the pet you use, your results may vary. I strongly recommend an Epic pet, and preferrably a Fire one, unless you can get your hand on a Life pet, but be aware that things may not work the same for you!
(Back to Top)
Jan. 10: At this point, I've finished every track at least at a bronze level, so if you need tips on a specific level, comment below. As I revisit the levels attempting to obtain gold, you'll see those successes.
Jan. 17: By now, I've updated the list with far more than before. Check them out!
Jan. 18: More videos added!
Jan. 21: More videos added!
Important Note: These levels are done with an Epic Fire pet. Depending on the pet you use, your results may vary. I strongly recommend an Epic pet, and preferrably a Fire one, unless you can get your hand on a Life pet, but be aware that things may not work the same for you!

Long ago, the titans - Ice, Fire, and Storm - fought long battles and destroyed the lands. One by one, however, they were contained in their own ways - the Ice titan put to sleep, the Dragon titan held in stone, etc. The Grandfather Tree, Bartleby, and Grandmother Raven put the pieces of these worlds back together to form the Spiral.
Bartleby became the center of the first Wizard101 world - Wizard City, which is also the center of the Spiral. This city was built around the Grandfather Tree, whose roots held the world together.
Wizard City became the home of a renown institution - Ravenwood School of Magical Arts! It's where every wizard begins his journey to stop the shadow of evil that has begun to pass over the city.
Here we learn about the culprit behind these shadows: Malistaire Drake, who plans to wake the Dragon titan, return his wife from the dead, and rule the Spiral!

Krokotopia is called "a land of forgotten treasures" with desert surrounding an oasis in the shadows of the great pyramids.
In this second Wizard101 world, wizards set out on a journey to stop the Kroks, who have enslaved the Manders, as well as discover hidden secrets about the Order of the Fang and other ancient treasures and enemies in Krokotopia.
Among the chaos of battling ensorcelled Manders and crazed Crocodiles with lipstick, you must set out to stop Malistaire from stealing the Krokonomicon, which is to be used in the summoning of the Dragon titan.

In a world full of cats, dogs, and proper manners, gangs of these same critters run across the rooftops of buildings, stealing valuables from this modern city, and dueling any wizard they can catch.
Through a scheming feline named Meowiarty, Malistaire plans to escape through Marleybone, the third world of the Spiral. Sherlock Bones and Watson, however, are on the case.
Here you'll fight to restore the streets of Marleybone and stop Meowiarty and Malistaire, who are hiding in Big Ben clocktower.

With the Emperor falling ill from Malistaire's curse, what was once a peaceful, and serene land has been overrun by Ninja Pigs, rogue Samoorai, and evil Oni!
To gain the trust of the Emperor, you must journey through these culture and history-filled areas, battling through any and all forces of evil to restore the peace that MooShu once had.
If you can manage to save the Emperor and restore peace, he may be willing to give you a key to the world of Dragonspyre - where Malistaire is making his final preparations.
This fourth world of the Spiral is the last one that was part of the original game, and, as such, contains special items and new wands that are swords.

Taking a darker turn in Wizard101, Dragonspyre is the fifth world, and final hiding place for Malistaire. Here, at the top of the volcano, he will wake the Dragon titan.
What was once an advanced society soon became nothing but a world filled with lava, fire, and ghosts. The summoning of the Dragon titan was this world's downfall, when it destroyed much of the area, including every school and school tree in Dragonspyre Academy, with the exception of the Fire School, which still stands.
Here, wizards will finally battle Malistaire face-to-face, with the Dragon titan nearly fully awake!

Tribes of Bears, Wolves, Ravens, and Trolls roam the areas of Grizzleheim and Wintertusk, constantly at war with wizards and each other.
In the sixth world release-wise, wizards set out on an all new storyline to stop the evil Coven from bringing the Everwinter to Grizzleheim and and the Spiral. What begins at a low level soon turns into a high-level challenge when your wizard must face the four members of the coven in the final battle of Grizzleheim.
Released later, the world of Wintertusk continues that same storyline, in a much colder environment. Here, Grandmother Raven is imprisoned, and you are on a mission to free her, and save the Spiral from the Everwinter.
Deep below Grandmother Raven's perch is the underground area of Nastrond, where four brothers await to stop you from stopping the Coven - for it is here that the Ice titan sleeps, and they plan to wake him!

Wysteria is home to a rival school of Ravenwood - Pigswick Academy! Here, the pigs learn spells from seven different schools. This year, Pigswick is hosting an inter-school tournament, you you're the Ravenwood representative.
Things start to get crazy, however, when the Spiral Cup goes missing during your tournament, and you're the prime suspect! If that weren't bad enough, the world is being overrun by Goblins and Green Men, all led by the evil Lord Bramble.
In this side world, your wizard will fight in the tournament, work to clear your name, and stop evil from taking over Pigswick. Be careful, though, because your allies may actually be your enemies!

Long ago, the Celestians drew power from the Sun, Moon, and Stars to create three new types of magic. A sorceress named Morganthe demanded the magic for herself. When refused, she raised a dark army against the Celestians.
They fought back, but realized themselves to be doomed, and so they summoned the Storm titan to save them and destroy the army. Instead, he sunk all of Celestia along with Morganthe's dark forces. The Celestians brought up huge domes to protect the city, but it was too late - the world was lost forever beneath the waves.
Centuries later, professor Balestrom received word from an old friend of his who was trapped in Celestia. With the recovery of the Spiral key from an old Warehouse guarded by Shadow Weavers, you're able to travel to Celestia to save the city from the never-ending evil forces of Morganthe, and stop her from gaining the astral magic, which the Celestians allow you to learn.
Morganthe escape, and leaves you with a prophecy.

Merle Ambrose, as we soon learn, has had some past encounters with Morganthe. In a fantastic cutscene in Merle Ambrose's tower, where Morganthe attacks an shatters the Spiral crystal, Merle banishes her from Wizard City, and sets us out on a mission to stop her from retrieving her Deck of Shadows, which he hid in Mirror Lake long ago.
You'll set out on a long journey through Zafaria, battles giant apes, rhinos, zebras, and more! You'll have to save a group of students who has been captured there, as well as saving the prince, and stopping Morganthe from getting her Deck of Shadows.
Despite exhaustive efforts, Morganthe drains Mirror Lake, fulfilling the first line of the prophecy, and escaping with her Deck of Shadows.

In the medieval world of Avalon, Morganthe is nowhere to be seen, but a number of other enemies are.
In Avalon, Merle Ambrose's home world, you must battle Morganthe's minions, and even Morganthe in the past, to secure the Sword of Kings - and essential weapon for defeating Morganthe with her Deck of Shadows.
Fight dragons, froundlings, deer, knights, witches, and more in order to restore hope to Avalon and its people.
Instance Guides
Statistics:
Bosses: 3
Number of Enemies/battle: 3 for one person, 4 for two or more
People Recommended: 2-4; adjust based on level
Start Location: Nightside
Estimated Time: 1 hour, 30 minutes; less with friends
Enemies: Wandering Spectre - 500 health; Wailing Wraith - 575 health; Paulson, Boss - 800 health; Living Scarecrow - 675 health; Norton, Boss - 800 health; Grubb, Boss - 1000 health
IMPORTANT NOTES:
Deep Mushrooms, Ore, and Red Mandrakes are available for taking in this instance. Occationally you will harvest Nightshade. Grubb drops the well-liked Wraith statue, a housing items. Also, after finishing the instance, you receive the Sunken City Survivor badge.
Below is a map of Nightside, and in case you didnt notice it, I have circled the entrance to Sunken City:

After talking to Marla, you're ready to start.
First, you will have to find a magical item to gain access to the gates. Find the tower, located at the very bottom left of the map above. Here you will encounter three creatures:

Return to Marla, and she will tell you to meet her on ahead. From here on, there shouldnt be that any, if any, unavoidable battles. Once again, you will have a gate to open. The following map shows these things: Red dots represent gates, which must be unlocked, and green dots are towers:

Journey to the tower, to meet these guys:

After this, you return to Marla, then you unlock the gate. I experienced a few forced battles along the way, as it is a long walk to Marla. You will then need the key to Grubb's Castle. You must make your way back to Norton's Tower, shown here:

The tower is similar to a gauntlet. It had different levels. First you will encounter 3 Wondering Specters, then on the next level you will find 1 Wondering Specter, and 1 Wailing Wraith. On the third level are 2 Wailing Wraiths, on the fourth are 1 Wailing Wraith, and one Living Scarecrow. You will then be presented with a room containing a few wisps. Finally, on the fifth level, you will find Norton, gaurded by 2 Wondering Spectors.
You now have acces to the final boss, Grubb. He has 2 Living Scarecrows as gaurds with one person, and 3 with two or more people.
Congratulations on beating Grubb! (Back to Top)
IMPORTANT NOTES:
Deep Mushrooms, Ore, and Red Mandrakes are available for taking in this instance. Occationally you will harvest Nightshade. Grubb drops the well-liked Wraith statue, a housing items. Also, after finishing the instance, you receive the Sunken City Survivor badge.
Below is a map of Nightside, and in case you didnt notice it, I have circled the entrance to Sunken City:
After talking to Marla, you're ready to start.
First, you will have to find a magical item to gain access to the gates. Find the tower, located at the very bottom left of the map above. Here you will encounter three creatures:
Return to Marla, and she will tell you to meet her on ahead. From here on, there shouldnt be that any, if any, unavoidable battles. Once again, you will have a gate to open. The following map shows these things: Red dots represent gates, which must be unlocked, and green dots are towers:
Journey to the tower, to meet these guys:
After this, you return to Marla, then you unlock the gate. I experienced a few forced battles along the way, as it is a long walk to Marla. You will then need the key to Grubb's Castle. You must make your way back to Norton's Tower, shown here:
The tower is similar to a gauntlet. It had different levels. First you will encounter 3 Wondering Specters, then on the next level you will find 1 Wondering Specter, and 1 Wailing Wraith. On the third level are 2 Wailing Wraiths, on the fourth are 1 Wailing Wraith, and one Living Scarecrow. You will then be presented with a room containing a few wisps. Finally, on the fifth level, you will find Norton, gaurded by 2 Wondering Spectors.
You now have acces to the final boss, Grubb. He has 2 Living Scarecrows as gaurds with one person, and 3 with two or more people.
Statistics:
Bosses: 2
Number of Enemies/battle: 2 for 1 person, 3 for 2 people, and 4 for 3-4 people
People Recommended: 1-3; adjust based on level
Start Location: Palace of Fire
Estimated Time: 30 minutes; less with friends
Enemies:
IMPORTANT NOTES:
You will commonly find Ore, Parchment, and Wooden Chests in this instance.
Below is a map of the Palace of Fire. I have circled the entrance to the Throne Room:

Curve around the corner to see Professor Winthrop, who tells you about his discoveries. You now need to collect the serpent staff. Find your way to the prince. Here is a picture of Professor Winthrop:

As well as a picture of your first boss, marked by the red dot:

To gain access to the prince, you must solve a very simple puzzle. Read the book and you will be told that you cannot enter unless all of the Braziers bun a certain color. Here are the different colors:
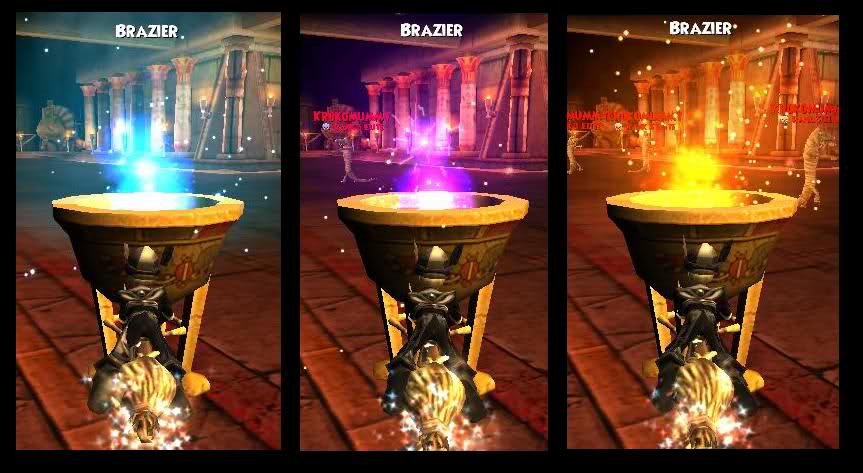
From Left to Right: Green, Purple, Red
Now you can defeat this boss! Return to Profesor Winthrop to discover your next task. You must now collect the Eye of Krok. You must defeat Krokenkahmen to get this item. Krokenkahmen walks a certain path, marked by the red. After this battle you can use an alternate, shorter route to return to Professor Winthrop, marked by the green:

To gain access to Krokenkahmen, you must once again solve a simple puzzle. Light up the suns and turn off the moons:

Now look at the map to see Krokenkahmen's path. Walk this path until you find him. Here is a picture of the battle:

Now follow the green route back to the Map Room. All you have left to do is go up onto the platform and use the staff!
Congratulations! (Back to Top)
IMPORTANT NOTES:
You will commonly find Ore, Parchment, and Wooden Chests in this instance.
Below is a map of the Palace of Fire. I have circled the entrance to the Throne Room:
Curve around the corner to see Professor Winthrop, who tells you about his discoveries. You now need to collect the serpent staff. Find your way to the prince. Here is a picture of Professor Winthrop:
As well as a picture of your first boss, marked by the red dot:
To gain access to the prince, you must solve a very simple puzzle. Read the book and you will be told that you cannot enter unless all of the Braziers bun a certain color. Here are the different colors:
From Left to Right: Green, Purple, Red
Now you can defeat this boss! Return to Profesor Winthrop to discover your next task. You must now collect the Eye of Krok. You must defeat Krokenkahmen to get this item. Krokenkahmen walks a certain path, marked by the red. After this battle you can use an alternate, shorter route to return to Professor Winthrop, marked by the green:
To gain access to Krokenkahmen, you must once again solve a simple puzzle. Light up the suns and turn off the moons:
Now look at the map to see Krokenkahmen's path. Walk this path until you find him. Here is a picture of the battle:
Now follow the green route back to the Map Room. All you have left to do is go up onto the platform and use the staff!
Statistics:
Bosses: 4
Number of enemies/battle: 2 for 1 person, 3 for 2 people, 4 for 3-4 people
People Recommended: 1-2; adjust according to level
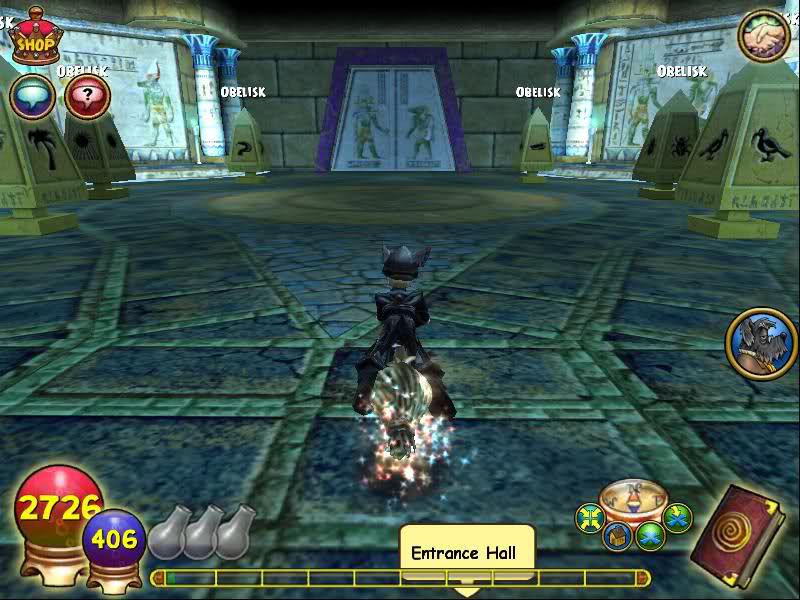
Start Location: Entrance Hall
Estimated Time: 45 minutes; less with friends
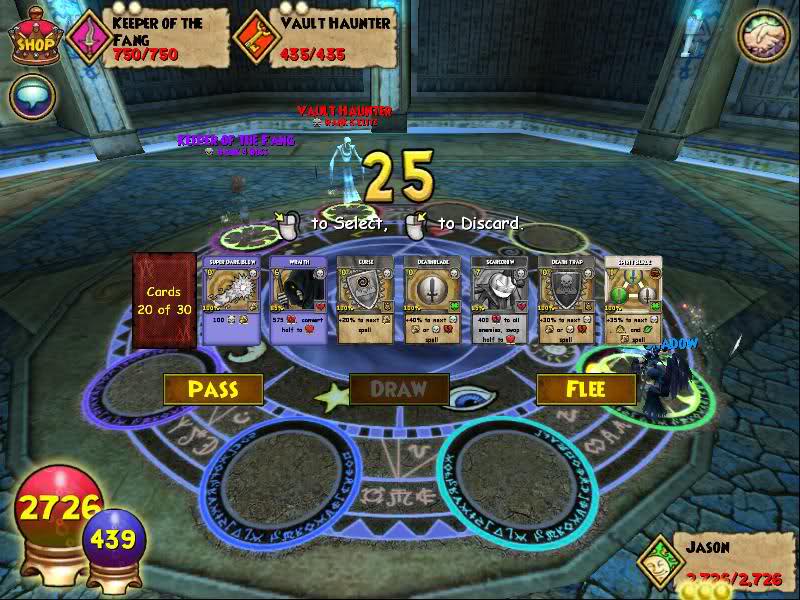
Enemies: Vault Haunter - 435 health; Defender of the Fang, Boss - 600 health; Guardian of the Fang, Boss - 600 health; Protector of the Fang, Boss - 600 health; Keeper of the Fang, Boss - 750 health; Vigilant Defender - 500 health
IMPORTAT NOTES:
In the instance, you can find Wooden Chests, Parchment, Ore, and stone Blocks. After the final boss is a large obelisk-like object that is needed for a quest from the Krokotopian Librarian.
Alright! After recently finishing the Throne Room of Fire, you have move on to the Krokoshpinx, where you encounter the Vault of Ice. Below is a map of the entrance. I have put a red dot by the beetle, located near the entrance:

Now all you have to do is defeat the Keeper of the Fang and get the Golden Fang! Easy right? Wrong! Three other bosses and puzzles coem before you even get a shot at the Keeper. Here is a map of a possible route:

Each Boss is protected by 1 Vault Haunter. After the Battles, a puzzle will appear with this message; this is the puzzle for the Defender:

This puzzle is simple: change the colors as to how they are related to the standards. The defenders puzzle is simple: It shows fire, ice, then storm. Here are each of the braziers:

From Left to Right: Fire, Ice, Storm
After you solve a puzzle, you will see this:

Be sure to check the entrances for reagents or chests:

Now for the battles with the others. Here is the Gaurdian's puzzle. You must change the position of the lever to activate the obelisks in order:

Now for the Protector's Puzzle, simple activate the obelisks in order:

Now for the final battle with the Keeper:
Now you have the fang! Talk to Shalek the Wise to finish the instance!
Congratulations on completion! (Back to Top)
IMPORTAT NOTES:
In the instance, you can find Wooden Chests, Parchment, Ore, and stone Blocks. After the final boss is a large obelisk-like object that is needed for a quest from the Krokotopian Librarian.
Alright! After recently finishing the Throne Room of Fire, you have move on to the Krokoshpinx, where you encounter the Vault of Ice. Below is a map of the entrance. I have put a red dot by the beetle, located near the entrance:
Now all you have to do is defeat the Keeper of the Fang and get the Golden Fang! Easy right? Wrong! Three other bosses and puzzles coem before you even get a shot at the Keeper. Here is a map of a possible route:
Each Boss is protected by 1 Vault Haunter. After the Battles, a puzzle will appear with this message; this is the puzzle for the Defender:
This puzzle is simple: change the colors as to how they are related to the standards. The defenders puzzle is simple: It shows fire, ice, then storm. Here are each of the braziers:
From Left to Right: Fire, Ice, Storm
After you solve a puzzle, you will see this:
Be sure to check the entrances for reagents or chests:
Now for the battles with the others. Here is the Gaurdian's puzzle. You must change the position of the lever to activate the obelisks in order:
Now for the Protector's Puzzle, simple activate the obelisks in order:
Now for the final battle with the Keeper:
Now you have the fang! Talk to Shalek the Wise to finish the instance!
Statistics:
Bosses: 5
Number of enemies/battle: 2 for 1 person, 3 for 2 people, and 4 for 3-4 people
People Recommended: 1-3; adjust according to level
Start Location: Entrance Hall
Estimated Time: 45 minutes; less with friends
Enemies: Prince Suten Sokkwi, Boss - 750 health; Sokkwi Frostmancer - 435 health; Prince Kebi Sokkwi, Boss - 750 health; Ensorcelled Slave - 285 health; Sokkwi High Guard - 525 health; Overseeri Paniwi, Boss - 750 health
IMPORTANT NOTES:
Remember to fight Krokotep at the end if you need to! You will find Wooden Chests, Parchment, and Stone Blocks in this instance.
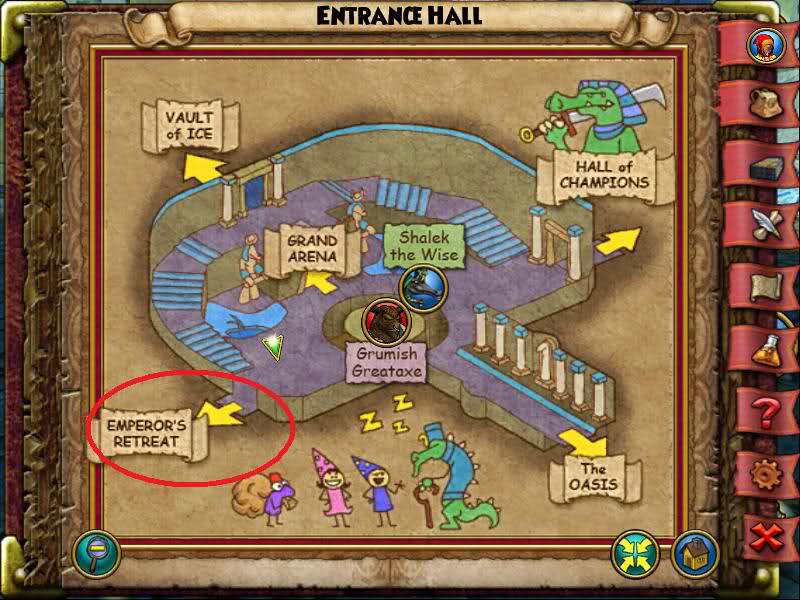
Ok, so after the Vault of Ice, you remember the Entrance Hall! That is the starting point of the Emperor's Retreat:
You must now talk to Shalek the Wise, who tells you to defeat two princes, each at different ends of the hall. This picture shows the recommended route:

Now you will have access to the Frozen Lake. Talk to Shalek, who commands that you free six shackled slaves, located where the red dots are on the map:

Now you have another boss to defeat! You must un-freeze the door to get access to this location! All of the Braziers are an icy teal color, as shown in the picture (to the very right) and they must all be a fiery orange color (center). But be careful-if you wait to long to activate them all then they will all reset:

Now for the battle with the Boss:

Return to Shalek, who needs you to retrieve a key from the Sokkwi Keymaster! Follow the route shown to fight him:

Now your quests here will be over, and a combination will appear behind the boss:
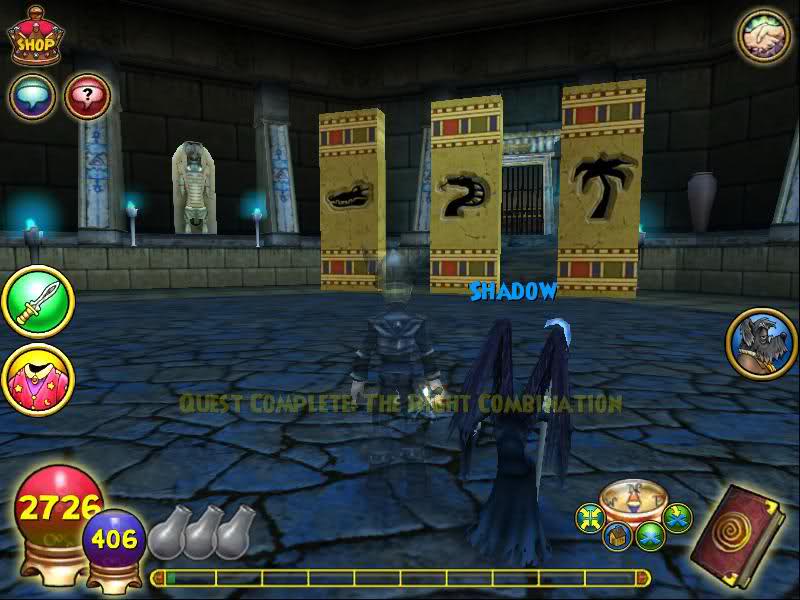
Though there are no more quests, if you are working in Krokotopia, you won't be finished yet! Turn the corner and a set of doors will open:

Now use the combination to unlock the final gate. Activate the different Obelisks:
Now you have access to Krokhotep! He is gaurded by one Sokkwi High Gaurd. He becomes one of the first Krokotopian bosses to have a chest. Here is a picture of his chest and the Golden Scarab after the battle:

Now you have completed the instance!
Congratulations! (Back to Top)
IMPORTANT NOTES:
Remember to fight Krokotep at the end if you need to! You will find Wooden Chests, Parchment, and Stone Blocks in this instance.
Ok, so after the Vault of Ice, you remember the Entrance Hall! That is the starting point of the Emperor's Retreat:
You must now talk to Shalek the Wise, who tells you to defeat two princes, each at different ends of the hall. This picture shows the recommended route:
Now you will have access to the Frozen Lake. Talk to Shalek, who commands that you free six shackled slaves, located where the red dots are on the map:
Now you have another boss to defeat! You must un-freeze the door to get access to this location! All of the Braziers are an icy teal color, as shown in the picture (to the very right) and they must all be a fiery orange color (center). But be careful-if you wait to long to activate them all then they will all reset:
Now for the battle with the Boss:
Return to Shalek, who needs you to retrieve a key from the Sokkwi Keymaster! Follow the route shown to fight him:
Now your quests here will be over, and a combination will appear behind the boss:
Though there are no more quests, if you are working in Krokotopia, you won't be finished yet! Turn the corner and a set of doors will open:
Now use the combination to unlock the final gate. Activate the different Obelisks:
Now you have access to Krokhotep! He is gaurded by one Sokkwi High Gaurd. He becomes one of the first Krokotopian bosses to have a chest. Here is a picture of his chest and the Golden Scarab after the battle:
Now you have completed the instance!
Statistics:
Bosses: 4
Number of enemies/battle: 2 for 1 person, 3 for 2 people, and 4 for 3-4 people
People Recommended: 1-3; adjust according to level
Start Location: Karanahn Barracks
Estimated Time: 45 minutes; less with friends
Enemies: Prince Mkhai Karanahn, Boss - 510 health; Crazed Slave - 310 health; Prince Meti Karanahn, Boss - 600 health; Karanahn Deathfeeder - 475 health; Prince Ati Karanahn, Boss - 700 health; Karanahn Mortifier - 575 health; Prince Aka Karanahn, Boss - 900 health
IMPORTANT NOTES:
In this instance, you will find Wooden Chests, stone blocks, parchment, and Deep Mushrooms. Most of these are in between bosses, positioned on streets, or behind the mummies in their coffins! The final boss drops the Krokotopian Counter, a crown item.
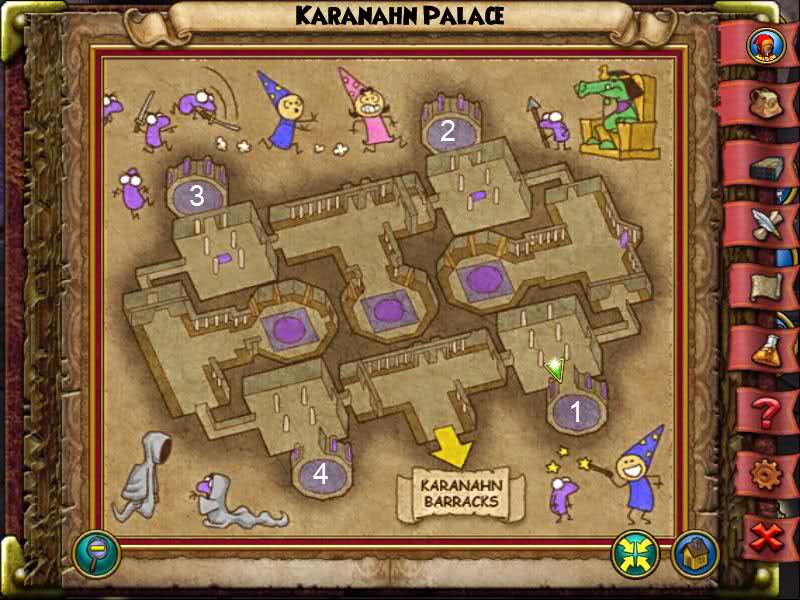
Alright, after journeying to the Well of Spirits, and entering the Karanahn Barracks, you can enter the palace, circled on this map:

In the instance, you will have no quest, only a goal: defeat one boss. But there are a few others in your way! Here is the route of bosses that you will make:
This should be a very simple instance, with such a simple goal. Here is a picture of the first battle:

Now continue to the next battle, as a message appears like this one:

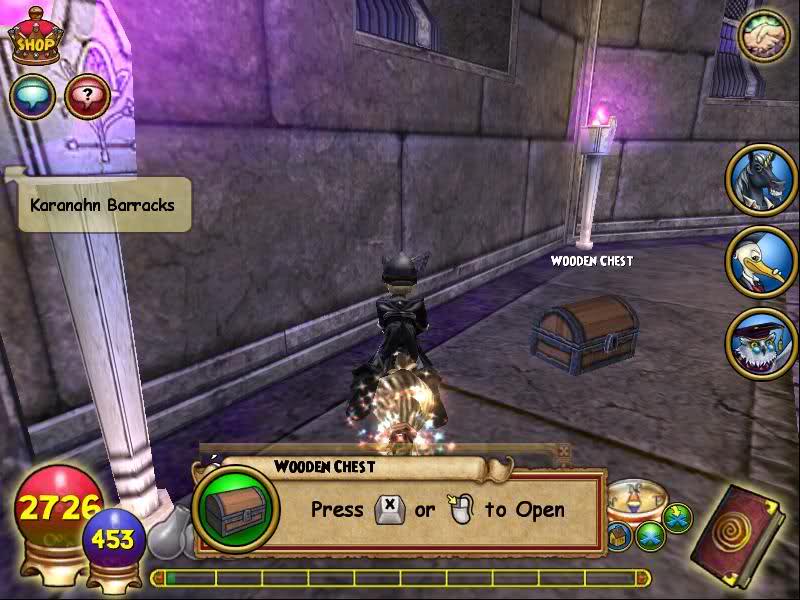
Now continue to the next battle, and look for regeants and wooden chests! Some are shown below:
Now here is the second battle:

Once again, a door will open, and, as before, the last boss's minion will become a street creature here. Here is the third battle:

Unlike the previous two times, the boss's minion will not become a new street creature. Here is the fourth and final battle:

Simple, right? Now you're done!
Statistics:
Bosses: 4
Number of enemies/battles: 1-2
People Recommended: 2-3; adjust according to level
Start Location: Well of Spirits
Estimated Time: 45 minutes; less with friends
Bosses: 4
Number of enemies/battles: 1-2
People Recommended: 2-3; adjust according to level
Start Location: Well of Spirits
Estimated Time: 45 minutes; less with friends
Enemies: Tempestra, Boss - 600 health; Soulsapper, Boss - 750 health; Son of Storms, Boss - 750 health; Krokopatra, Boss - 1200 health; Karanahn Queen Guard - 525 health; Plague Mist - 550 health; Karanahn Deathfeeder - 475 health; Karanahn Defiler - 525 health; Blade Golem - 525 health
IMPORTANT NOTES:
You can find Parchment, stone blocks, deep mushrooms, and wooden chests in this instance. Krokopatra's chest begins at a cost of 75 crowns rather than 50.
We now near the end of Krokotopia. Once you complete this instance, you will possibly earn a new spell, in addition to unlocking Marleybone! Here in the Temple of Storms, before you get a chance at Krokopatra, you must prove yourself to the Temple Gatekeeper, through a test of mind and strength. Here is a map of the Well of Spirits, your entry to the temple. After all of your work in here, you should have noticed the temple, but if you haven't, I have circled it, although the Karanahn Barracks sign is over the temple entrance, this is the temple:

Once entering, you must follow the path around to this main room:

Now you will begin your first quest: Test of Strength. Talk to Shalek who will open a portal to your left to the test of strength. Here is a guide to the test! First you must fight Tempestra (for hitpoints, see pictures of all bosses/enemies in the instance below:

Next, to defeat Soulsapper:

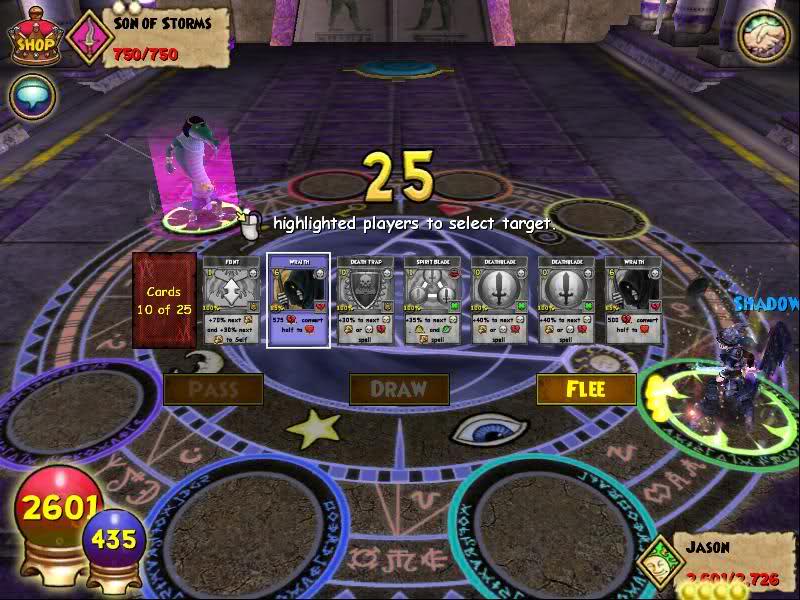
Now for the final boss, the Son of Storms:
Now continue to talk to the Temple Gatekeeper:

Easy, right? Now just to do the Test of Mind! You did bring yoru brain, didn't you? Here is the first room:

Simple, turn on everything that lives, and nothing that doesnt! Light up the Snake, tree, bug, and bird, but make sure the sun and moon are off. After you have completed the puzzle, another door will open, and a new puzzle will appear:

This is simple, reverse the order. If it is on, turn it off. In the end, the moons should all be on, and all of the suns should be off. As before, once you complete the puzzle, this message will appear:

Now to the final puzzle. The book cant be read until the lighting is correct for storm. At first the book will say this (notice the brazier):

Now after changing the lighting to a purple storm color, it will look like this:

Now there is a short poem:
The Sun shines down on the tree,
The tree shades the snake,
The snake hisses at the beetle,
The beetle runs away.
This poem reveals the order for the obelisks: Sun, tree, snake, beetle.
Now continue on, and use the portal behind the Gatekeeper:

Follow the following path to find Krokopatra. When you get to the doors, you may be confused, however all it requires is for you to walk up to them, then they will open:

Here is a picture of the final battle with Krokopatra:

Now you are finished! For some reason, Krokopatra respawns right after the battle. Perhaps you no longer have to reastart the instance to fight her! And she has a chest!
Congratulations, you have completed Krokotopia! (Back to Top)
You can find Parchment, stone blocks, deep mushrooms, and wooden chests in this instance. Krokopatra's chest begins at a cost of 75 crowns rather than 50.
We now near the end of Krokotopia. Once you complete this instance, you will possibly earn a new spell, in addition to unlocking Marleybone! Here in the Temple of Storms, before you get a chance at Krokopatra, you must prove yourself to the Temple Gatekeeper, through a test of mind and strength. Here is a map of the Well of Spirits, your entry to the temple. After all of your work in here, you should have noticed the temple, but if you haven't, I have circled it, although the Karanahn Barracks sign is over the temple entrance, this is the temple:
Once entering, you must follow the path around to this main room:
Now you will begin your first quest: Test of Strength. Talk to Shalek who will open a portal to your left to the test of strength. Here is a guide to the test! First you must fight Tempestra (for hitpoints, see pictures of all bosses/enemies in the instance below:
Next, to defeat Soulsapper:
Now for the final boss, the Son of Storms:
Now continue to talk to the Temple Gatekeeper:
Easy, right? Now just to do the Test of Mind! You did bring yoru brain, didn't you? Here is the first room:
Simple, turn on everything that lives, and nothing that doesnt! Light up the Snake, tree, bug, and bird, but make sure the sun and moon are off. After you have completed the puzzle, another door will open, and a new puzzle will appear:
This is simple, reverse the order. If it is on, turn it off. In the end, the moons should all be on, and all of the suns should be off. As before, once you complete the puzzle, this message will appear:
Now to the final puzzle. The book cant be read until the lighting is correct for storm. At first the book will say this (notice the brazier):
Now after changing the lighting to a purple storm color, it will look like this:
Now there is a short poem:
The Sun shines down on the tree,
The tree shades the snake,
The snake hisses at the beetle,
The beetle runs away.
This poem reveals the order for the obelisks: Sun, tree, snake, beetle.
Now continue on, and use the portal behind the Gatekeeper:
Follow the following path to find Krokopatra. When you get to the doors, you may be confused, however all it requires is for you to walk up to them, then they will open:
Here is a picture of the final battle with Krokopatra:
Now you are finished! For some reason, Krokopatra respawns right after the battle. Perhaps you no longer have to reastart the instance to fight her! And she has a chest!
Statistics:
Bosses: 3
Number of enemies/battle: 2 for 1 person, 3 for 2 people, 4 for 3-4 people
People Recommended: 1-3; adjust according to level
Start Location: Digmoore Station
Estimated Time: 1 hour, 15 minutes; less with friends
IMPORTANT NOTES:
Many of these bosses have unique drops, however none have chests. You can find Wooden Chests, Ore, Mist Wood, and Scrap Iron in this instance.
Here we are deep into the world of Marleybone. Begin at Digmoore Station, and talk to the Tracey Castlton to get a ticket, then use the...the flying boat...to go the Ironworks. Here is a map of the Ironworks:
Bosses: 3
Number of enemies/battle: 2 for 1 person, 3 for 2 people, 4 for 3-4 people
People Recommended: 1-3; adjust according to level
Start Location: Digmoore Station
Estimated Time: 1 hour, 15 minutes; less with friends
Enemies: O'Leary Napper - 525 health; Nails O'Leary, Boss - 1100 health; O'Leary Scurrier - 475 health; Brady the Sneak, Boss - 1200 health; Pops O'Leary, Boss - 1500 health; Scrounger - 525 health
IMPORTANT NOTES:
Many of these bosses have unique drops, however none have chests. You can find Wooden Chests, Ore, Mist Wood, and Scrap Iron in this instance.
Here we are deep into the world of Marleybone. Begin at Digmoore Station, and talk to the Tracey Castlton to get a ticket, then use the...the flying boat...to go the Ironworks. Here is a map of the Ironworks:

Below is a map of the direction all of the creatures run, as well as a few key areas:

Alright, talk to Baxter:

Now defeat some O'Leary Nappers for a key! Talk to Baxter again, you tells you to go to the gate door. Make your way there and open it to discover that a combination is needed. Now talk to him again, and he will tell you to defeat Nails O'Leary. Look at the map of how the enemies run if you must, then head to him. Now look up before leaving:

The combination is Snake, Bird, Bug. Go back to Baxter, then open that gate! Put in the combination in order, then pull the lever. Travel around the corner to Baxter, you needs you to collect plans:

Return to Baxter who tell you to go inside, then left up the ramp to figure out who is hiding in there! You wont be able to enter, so you will have to talk to Baxter to find out the secret knock. Time for another boss!
But first, you are being tricked! There are four panels on the ground, and two doors. The combination for each door in shown by the door. Choose to open the door on your left. The combination is:
Bird
Moon (Dog)
Tree
Bug
When you have opened a door, a message will appear saying nothing other than: A Door Has Opened. Go to Brady:

Now Defeat Brady, and return to that same door to find Pops O'Leary, the final boss! His room is full of surprises! Here is a picture of all of the things included in his room:

The green arrows are paths that you can use.
The green dot is some Ore you can collect.
The black dot is a Wooden Chest.
The red dots are Pops and his minion.
The yellow dot is a History Book.
The blue dot is a Stray Cat.
Here is a picture of the final battle:

Defeat him and talk to Baxter to finish the instance.
Sun School Trainer: Looks like a machine.

Star School Trainer: This trainer looks like one of Celestia's machines or whatever you prefer to call them. There are two around the area, easy enough to find.

Moon School Trainer (1): This trainer is another machine like in the base camp where you find the trainers who will teach you the first of the astral schools.

Moon School Trainer (2): This one is particularly hard to find. He's not on the main street in the Ossuary, like you might think, but behind it. Before "jumping" into Stormriven Hall, turn left and go around all the ruins and walls until you find him.

All School Secret Trainer: This trainer is Tupa Taua. He will teach you larger scale versions of taunt, subdue, etc. These are available for almost every school.

Sun School Trainer (Mutations): He is located behind one the walls. Pretty simple to find.

Pirate101 Background Story and Characters
It is a wondrous time of exploration and adventure, when tall ships fly the endless skies and brave the Stormgates of the Spiral. Not long ago, a generation of explorers led by the great Marco Pollo opened and mapped dozens of connections between the various realms. Trade and commerce sprang up all over the Spiral, and many nations learned that the size and strength of their fleets were the key to their destiny. Marleybone, Valencia, Monquista, and Polaris emerged as the dominant powers of the era, forming colonies and forging trade routes that made them wealthy and powerful. Grizzleheim and many other realms, tried to stay neutral, trading with all and claiming no empire.
Competing colonial interests led to tension between the great powers, and then to war. Polaris, led by Emperor Napoleguin, launched a great war against Marleybone, Valencia, and Monquista. Every other realm in the Spiral soon found themselves drawn into the conflict as allies, mercenaries, or battlefields. Napoleguin's military genius and strong navy brought the Spiral to its knees - his victory seemed assured, but Marleybone's staunch resolve and Valencia's new clockwork Armada finally defeated him.
The war and its aftermath was a wild, lawless time in the Skyways. Colonies, cut off from their owners, collapsed into anarchy or fell to hostile raiders. Mercenary ship captains constantly switched allegiances, fighting for Marleybone this week and Polaris the next, switching flags whenever the winds of profit and fortune changed. In time, some of these captains refused to follow any nation - they saw the ships of every side as prizes waiting to be pillaged. The first Pirates were born.
The war and its aftermath was a wild, lawless time in the Skyways. Colonies, cut off from their owners, collapsed into anarchy or fell to hostile raiders. Mercenary ship captains constantly switched allegiances, fighting for Marleybone this week and Polaris the next, switching flags whenever the winds of profit and fortune changed. In time, some of these captains refused to follow any nation - they saw the ships of every side as prizes waiting to be pillaged. The first Pirates were born.
Pirates flourished in the outer reaches of the Spiral, where the colonial powers spread their forces thinner and thinner. In Skull Island, gangs of Pirates took control of entire Skyways, building their own ports and cities and launching daring raids in every corner of the Spiral. After the war's end, the great navies had been humbled and broken - no one could stop the spread of piracy, and the Pirate lords amassed huge hoards of plunder and gold. Captain Avery dreams of transforming Skull Island from a den of thieves into a new Pirate republic. This is the Golden Age of Piracy, when Wharf Rats and Cutthroats can make imperial navies tremble.
But winds of change are blowing across the Spiral. Marleybone's Royal Navy is regrouping, and lawless Skyways are being tamed. The Armada continues to rise. The Clockworks are supposed to be the military of the Valencian monarchy, but many are beginning to wonder if the Clockworks and their leader, Kane, don't have an agenda of their own. The Armada keeps growing, despite the end of the war it was created to fight. Now Armada ships are venturing into distant realms, hunting down Pirates and enforcing the law as they define it.
But winds of change are blowing across the Spiral. Marleybone's Royal Navy is regrouping, and lawless Skyways are being tamed. The Armada continues to rise. The Clockworks are supposed to be the military of the Valencian monarchy, but many are beginning to wonder if the Clockworks and their leader, Kane, don't have an agenda of their own. The Armada keeps growing, despite the end of the war it was created to fight. Now Armada ships are venturing into distant realms, hunting down Pirates and enforcing the law as they define it.


Boochbeard's exploits are legend in every corner of the Spiral, and he is known by many names in many different ports: the Pirates of MooShu whisper of the Flying Sloth, the Marleybonian Navy still offers a bounty for Old Whitebeard, and the children of Santo Pollo sing songs of the kindly (and clumsy) El Boocho. Boochbeard is at once the luckiest and unluckiest Pirate alive - ever thwarted, yet always surviving. He has an uncanny talent for being around for important events.
A gifted naval tactician and born commander, Gandry was a rising star in the Monquistan Navy when a matter of honor and a duel led him to renounce his commission and defect to Polaris, where he quickly earned the rank of Captain, acquired a thick Polarian accent, and served with distinction in Napoleguin's Navy. At the peak of the Polarian Wars, a dispute with a fellow officer led him to leave the Polarian Navy and jump ship to serve in the Marleybonian Navy. Before long, Gandry led a mutiny and became a Pirate.
After a brief stint as an independent Privateer, he joined forces with Boochbeard, and has served as his first officer longer than he lasted in any of his three navies. Some suspect that Gandry is the real brains behind Boochbeard's operation, and that the monkey is content to hide behind the buffoon and use him as a figurehead to hide his true scheme.
After a brief stint as an independent Privateer, he joined forces with Boochbeard, and has served as his first officer longer than he lasted in any of his three navies. Some suspect that Gandry is the real brains behind Boochbeard's operation, and that the monkey is content to hide behind the buffoon and use him as a figurehead to hide his true scheme.

Horace Avery is famous throughout the Spiral as one of the most successful Pirates in history - he managed to retire with both his fortune and life intact. Avery amassed a heap of plunder during the Polarian Wars, raiding Monquistan treasure fleets.
A few years ago, Avery won the stewardship of Skull Island from the Marleybonian governor in a bet. In the years since, Avery has transformed the former Marleybonian colony into the greatest Pirate haven in the Spiral.

Now he serves as Avery's chief bodyguard, and also trains new recruits in the way of the sword.

Sadly the Commodore (nobody is quite certain what his real name is) is getting on in years, and his hearing and memory aren't what they once were.

He sailed with a number of infamous Pirates, including Catbeard, Erica the Red, and Captain Avery before settling down on Skull Island. Known for his gruff disposition and foul temper, Ol' Fish Eye's aim is as sharp as ever.

Trained by some of the finest fencers in Valenica, Morgan's skill with a blade has few equals. Morgan fled Valencia when her secret was finally uncovered, keeping a step ahead of the Armada and finally settling in Skull Island.

Vadima is an amazing fortune teller: the prophecies she sees through card reading and crystal gazing have earned her a high place in Avery's organization. Though often confusing, her pronouncements are rarely wrong.
Pirate Factions
The Monquistans got their fill of naval battles in the Polarian Wars, and are leery of overextending themselves - at least for now. Their ships are of high quality, but Monquista lacks the naval tradition of its rivals in Polaris, Valencia, and Marleybone - Monquistan commanders, with a few exceptions, are widely regarded as inexperienced and brash. Monquistan arrogance and bravado leads them to mount fierce, swift attacks with little provocation.
Tensions between Monquista and Marleybone are steadily growing - war may be inevitable.
The Royal Navy of Marleybone is an omnipresent force across the Spiral - the Queen's highest priority is her mercantile empire, which depends on the "wooden ships and iron Dogs" of the Navy for its very survival. Marleybone ships are stout and tough, and the Dogs are masters of tactics and gunnery.
With colonies in Skull Island, Darkmoor, and Krokotopia and trade agreements nearly everywhere else, protecting the flow of ships between colonies and especially through Stormgates is Marleybone's highest priority. Marleybone may not have the biggest fleet in the Spiral, but the Royal Navy is blessed with brilliant officers like Captain Gordon, The Commodore, and Admiral Nelson - their military genius more than makes up for any numerical disadvantage. Marleybone was eager to maintain her alliance with Monquista and Valencia, but both those friendships seem to be quickly unraveling.
When the Monquistans first came to Skull Island, the realm was home to dozens of bands of Shark Raiders, vicious warriors who raided ports throughout the Spiral. After years of hard battles, only one great Shark clan remains: the Cutthroats.
Exposure to the sailors of distant lands has changed the Sharks - the brutes have become Shark Pirates, taking on Pirate dress and customs and trading their outriggers for stolen ships.
Though they no longer have the numbers to raid other realms, the Cutthroats remain a threat in Skull Island, where Monquista and Marleybone remain unable to completely eradicate them.
This band of Crab thugs and raiders has fallen on hard times. Once feared by navies and merchants from Valencia to MooShu, the Red Claw Gang recently met its match: not long back, their flagship was destroyed after a pitched battle with Captain Gordon, renowned Marleybonian Privateer.
Stuck on Skull Island without a ship of their own, the villainous Crabs have taken up a life of robbery and intimidation, more bandits than Pirates now.
One secret organization of smugglers, Pirates, and criminals controls the transport of Yum and Yum-Yum fruit from MooShu to the rest of the Spiral: the infamous syndicate dominated by the Frogfather. From his home in Gullet, the Frogfather runs a tight operation that controls most of the smuggling in Skull Island, and across the Spiral.
Rare spices, Yum, and other contraband are the Frogfather's specialty. The Frogfather is fiercely loyal to his captains and terrible to his enemies.
The Isle of Scrimshaw is home to the Wharf Rats, a loose affiliation of criminal gangs and crews including such infamous villains as the Bilge Rats, the Rats of Nim, and the Rat Pack.
Bands of Rat Pirates roam the Skyways, raiding and stealing, but they rarely move in great numbers - the Rats are notoriously disorganized, and more likely to turn on each other than unite against a common foe. Every now and then a gang will make a power play, but for the most part the Wharf Rats remain an annoyance instead of a major threat, and have yet to wield much influence.
Tribes of Water Moles dwell across Skull Island, living in their humble villages and plying the Skyways in their canoes. Since the coming of the colonial powers, their power is waning: many tribes are no more, and many others have given up their ancestral ways to serve the Monquistans as miners and laborers. The two largest tribes that remain have responded to changing times in very different ways:
The Nui: Residents of Rapa Nui, the Nui tribe are peaceful - they trade with everyone, offering rare herbs, fish, and potions in trade for the mystifying trinkets and baubles the big folk bring them from other realms. Jovial and friendly, the Nui are well-liked by traders and Pirates alike.
The Waponi: The silver-haired Water Moles who dwell at the foot of the great volcano Waponi Wu have renounced their traditional ways: they worship a fire god instead of their ancestors, and have taken up arms against everyone they see as intruders in their realm - essentially everyone. Their blood feuds with the Nui are ancient and legendary, but their hostility toward everybody else is no less intense.
Pirate101 Classes and Choosing a Class
Choosing a class in Pirate101 can be difficult, because they're all great options. Besides that, between companions and other class specifics, the storylines are very different, and all worth looking in to. I have three ways to help you choose a class! First, you can take a quiz HERE and see which one you come out with. Second, I'll give a small explanation of each along with a recommended class based on your Wizard101 school. Finally, I'll give you information on all five to read through and think about.
Buccaneer - If you were a Storm wizard or an Ice wizard, you'll probably enjoy being a Buccaneer. These pirates have the biggest weapons and toughest armor, so they can withstand attacks while doing heavy damage. If you need a "tank" then these are your guys.
Musketeer - Almost unlike any school in Wizard101, the Musketeer is an all new experience. If you'd prefer to do moderate damage from afar, but have to avoid hand-to-hand combat as much as possible, a Musketeer might be for you.
Privateer - If you were a Myth or Life wizard, you're probably fit to be a Privateer. This is considered the healing pirate class, and can heal companions and allies. At the same time, they specialize in aiding allies, and can have more minions than any other class.
Swashbuckler - If you were a Fire wizard, you might want to be a Swashbuckler. While these pirates can do nearly as much damage as Buccaneers, they can't withstand attacks very well. However, they can move quickly and with ease and finesse.
Witchdoctor - If you were a Death or Balance wizard, I think you'll like the Witchdoctor class. They specialize in a variety of skills - hexes that weaken foes, ranged attacks, and spirit allies. While weak in a direct fight, and not as apt to help others, Witchdoctors can definitely hold their own.

Buccaneers are sturdy warriors who rely on brute strength to overcome their enemies. They wear the heaviest armor and carry the biggest weapons. What Buccaneers lack in grace or finesse they make up for with raw courage. Withstanding enemy attacks is the key to a Buccaneer's strategy.
As a Buccaneer, your Pirate is strong and tough! You can wear the heaviest armor and wield the biggest weapons in the Spiral. The Buccaneer's signature power, Blade Storm, gives your Pirate an extra attack if they drop an enemy in combat.

Musketeers are expert marksmen who use their mastery of firearms and trick shots to win battles. Musketeers damage their enemies at long range and keep them at a distance with traps and obstacles, denying foes any chance for hand-to-hand combat.
The Musketeer Pirate is a tricky one! You specialize in creating traps and obstacles to slow down your enemies so you can snipe them from a safe distance. The Musketeer's iconic power is the Rain of Mortarshells which blankets an area with explosive traps!

Privateers are born leaders, commanders who can rally their troops to victory through the most desperate of battles. Privateers can recruit more Companions than any other class, and their powers focus on boosting their Companions' capabilities and healing them in the thick of the fight.
It's good to be friends with a Privateer Pirate because their specialty is supporting and healing their allies & Companions. They can even go so far as to heal all their Companions with the Reinforce power received through training.

Swashbucklers rely on speed and finesse in combat, sneaking up on their foes and striking by surprise, then dodging the enemy's attacks when they finally arrive. They are deadly with a blade, but not nearly as tough as a Buccaneer, sacrificing toughness for damage.
Just like their cunning raccoon trainer, Swashbucklers are quick on their feet and skilled with a blade. After training for the Dance of Steel power, Swashbucklers can attack every enemy around them at the same time.

Witchdoctors are masters of the arcane, using the powers of hoodoo to rig the outcome of combat. While weak in a direct fight, Witchdoctors never fight fair - hexes that weaken foes, blasts of fire that strike at range, and summoned spirit allies all turn the odds in a Witchdoctor's favor.
Witchdoctors master hoodoo and the dark arts. Through their training they can learn the Mournsong power which summons spirits to drain the health of their enemies.
Companions

Companions are special helpers you pick up along the way in your Pirate adventures. They range in appearance and have different fighting styles and special abilities. Your Companions help you in battle as well as travel along beside you as you quest through Skull Island!
- Your first Companion is unique to your Pirate's story
- Additional Companions can be earned through Main & Side Quests
- You can choose your favorite or most powerful Companion to be your Pirate's Sidekick
- You can order your Companions to pick who is most likely to help you during combat
- Companions have special powers & combat abilities
- Companions can be trained & promoted
As your Pirate learns new skills and advances through the Spiral, your Companions may learn and train as well. Each time your Pirate advances a level, you gain special training points to level up your Companions.
Additionally, some Companions may be promoted. Once you complete a special promotion quest for them, they’ll become more powerful and look even cooler!
Both your Pirate and your Companions have Attributes. Attributes are a particular Stat that is applied to your Pirate and Companion.
- Strength increases damage for melee weapons
- Agility increases damage for ranged and finesse weapons
- Will increases damage for magical attacks
- Accuracy improves the chance that your attack will hit your enemy
- Dodge decreases the chance that enemy attacks will hit you
- Armor helps reduce the damage taken from physical attacks
- Range is the range of damage an attack will typically do
- Resistance helps reduce the damage taken from magical attacks
Ships
Sail through the Skyways on a quest for adventure, or simply take your Pirate friends on a sunset cruise! Ships show your Pirate's personality and power.
- Earn different levels of cool ships through questing
- Display your Pirate's signature flag on the sails of your ship
- Customize aspects of your ships like cannons, anchors, sails and much more!
- Fight enemies of the sky in ship to ship combat
Combat and Wielding
Battles begin with a planning phase, where you choose actions for your Pirate and Companions. Before executing your move, you can review information about characters and objects on the board by mousing over their portraits.
- Characters and Companions are under your control
- Other players’ Characters and Companions will have colors unique to them
- Inanimate objects have a brown background
- Enemies always have a red background
To use one, click on the icon and then click on a target. A beneficial Power shows a green target reticle over allies the Power can reach, and a red target reticule for enemies the Power can affect. The Power may also be able to affect an area, rather than a single unit – in that case you see green or red colored squares that move around as you move your cursor. Click on a target to use it.
NOTE: Some Powers are auto-casting. They don’t rely on you to tell them where to be used. A self-heal Power, for example.
- Defeat All Enemies - Defeat all opponents on the Battle Board to win.
- Use Objects - You will need to interact with objects on the Battle Board. Using these objects will either count as a victory or advance the current victory conditions.
- Protect an Ally - Keep the listed Henchmen alive for the duration of the fight. Failing to do so will count as a defeat.
- Survive X Rounds - You will need to survive the listed number of combat rounds.
- Defeat the King - You will need to defeat the listed Unit. It is important to note that you do not need to defeat his minions.
- Complete in X Turns - This Victory Condition will always be present with other Victory Conditions. You must complete the other Victory Conditions within the listed number of Combat Rounds; otherwise it will count as a defeat.
Pirate101 has not been released to the public yet, so we don't know a lot about Combat. My guess is that getting too close to an enemy means a battle. First, there's planning, where you choose companions and such. Then you play out a round on a board, and it's shown in actual combat between each round. See my post for more information!
Pirate101 Worlds and Their Story

The isles of Skull Island offer much to entice merchants and colonists: exotic fruits, spices, and timber draw high prices in markets across the Spiral, offering a fortune to any captain brave and resourceful enough to ship or smuggle them out. In the deepest jungles, crumbling ruins stand as remnants of a forgotten past. These ruins are the most dangerous places in Skull Island, but also the most tempting - the crumbling temples are adorned with solid gold!
Too far from the center of the Spiral for the great powers to exert much control, most of Skull Island is ruled by the Pirates themselves - crews and gangs have taken over failed colonies or built new ramshackle cities of their own: Jonah Town, Flotsam, Scrimshaw, and Skull Island itself, Captain Avery's Pirate capital.
The southern Skyways of Skull Island are dominated by Pirates, while the north features two great colonies: the thriving Monquistan city Puerto Mico, and the Marleybonian colony of Port Regal. Monquista owes its entire rise to the gold the Monkeys found in the ancient ruins, while the Dogs of Marleybone work tirelessly to corner the spice market. Their power broken long ago, the Cutthroats still prowl the shipping lanes, making as much trouble as they can, while Wharf Rats smuggle all manner of cargoes in and out of Skull Island, building a huge black market.

Monquistans have a highly structured (some would even say oppressive) society, where manners, personal dignity, and reputation are valued above all else. Disagreements over the most trivial matters turn into the stuff of generational feuds, and to many outsiders Monquistan politics and priorities can seem downright silly. The Monquistans believe they have brought themselves up out of barbarism through sheer force of will, and that they are the only truly civilized beings in the Spiral – all others are barbarians and pretenders. As a result, the Monkeys are well-mannered to a fault – to imply that a Monquistan is acting wild, brutish, or like a wild monkey is the greatest insult one can levy.
Well-mannered need not mean friendly: political intrigue between the Monarchy, the Holy Monquisition, and the various Noble Houses is vicious and deadly. Monquistan politics are notoriously fluid: a noble house can find that blood enemies from a month ago are now relatives by marriage, and therefore dear friends. Monquistan nobles and officials often seem, to outsiders, to have no memory: they arbitrarily turn on people they recently supported and praised, or greet blood enemies with effusive praise, never acknowledging any dispute.
Monquista is ruled over by a King and Queen (the power behind the throne changes day to day!), advised by the Holy Monquisition and presided over by the Noble Houses. Each faction seeks to advance its fortunes however it can. Every Monquistan is the member of a Noble House, and thanks to the endless web of marriage alliances and the shifting political landscape, all of them have some claim (however remote) to royal line. Even lowly servants are some kind of distant third cousin to a famous past king, causing everyone in the cluster to have a constant air of superiority.

The Skyways of Valencia have more Stormgates than any other realm in the Spiral - Valencians say their realm is the heart of the Spiral, and most sky charts are drawn with Valencia at the center. Valencia has used its location to flower into a thriving hub of trade and shipping between the realms.
Valencia's emerald skies and lush orchards are hauntingly beautiful, and the Unicorns are an emotional, zestful people whose passions are as stormy as their realm's skies. Unicorns are renowned throughout the Spiral for their talents with poetry, scholarship and fencing. Beneficiaries of Valencia's unparalleled wealth and status, the Unicorns dwell in ornate, baroque cities full of grand plazas, columned palaces, and grand statuary. There is always some grand ball, festival, or masque to offer entertainment and diversion. Duty, honor, and family pride are the pillars of their social order.
Valencia is also home to the hardy Crabs and pragmatic Guinea Pigs, who serve as the hard-working middle class to the Unicorn elite. Skilled craftsmen and tireless laborers, their efforts sustain the magnificent (some would say decadent) lifestyle of the Unicorns. Guilds and Merchant Houses of Crabs and Guinea Pigs drive Valencian commerce, and have grown very powerful in recent times.
Things are changing in Valencia. The recent invention of Clockworks was a wonder, whose full impact has yet to be seen. Kane and his legions revolutionized warfare in Valencia - at the height of the Polarian Wars, King Casimir turned all control of Valencians by land or sea over to Kane. The Armada won the war, saved the Spiral, and has worked tirelessly ever since. With Clockwork ships protecting merchant ships and stamping out smuggling and piracy, Valencia is growing even richer.
As the Unicorns turn inward, distracted by their endless revels, Kane grows ever more powerful, and rumors are emerging that the Armada may have an agenda of its own. Some wonder what price Valencia will pay for their success...

A steady stream of bold and enterprising Birds has come to Cool Ranch, hoping to make a new beginning or escape a troubled past. Their skill at industry rivals Marleybone's: the Birds brought locomotives, steam engines, and other modern devices with them. Life has been hard for the new settlers, however: many of the new boom towns soon went bust, and the great railroads now stand empty. But the honest ranchers and townsfolk keep working: there's gold in them there mesas, and there's good money to be made herding the sleepy Buffaloons. The steady demand for refined food and other niceties has nurtured a bustling mercantile trade for ship captains willing to sail that far.
Cool Ranch is a land of legendary figures: heroes like the Chicken Rangers, Wild Bill Peacock, and the masked hero El Toro, fighting lawlessness and standing up for the humble settlers; but the wild frontier has also fostered terrible outlaws like Libirdy Valence, El Guapo, and the dreaded Duck With No Name. Smugglers and pirates have always been drawn to Cool Ranch - far from everyplace, the dusty realm is an ideal place to hide. Indeed, Captain Barnabus Blood, one of the most infamous pirates in the history of the Spiral, is said to have built a hidden stronghold somewhere in Skull Island before his well-deserved end. Blood's treasure has never been found...
[full_width]


